Carpets are the unsung heroes of our homes. They add warmth, comfort, and style to any room, but they also endure a lot—muddy footprints, spilled coffee, pet hair, and more. Over time, even the most durable carpets can start to look worn and stained. While professional carpet cleaning is an option, DIY carpet cleaning is a budget-friendly and convenient alternative that lets you take control of your home’s cleanliness. In this guide, we’ll walk you through the steps to clean your carpets like a pro, share expert tips, and sprinkle in personal anecdotes to make the process relatable and effective.
Why Choose DIY Carpet Cleaning?
Before diving into the steps, let’s explore why DIY carpet cleaning might be the right choice for you:
- Cost Savings: Professional carpet cleaning can cost hundreds of dollars, especially for larger homes. DIY methods save you money while still delivering great results.
- Convenience: You can clean your carpets on your schedule, targeting high-traffic areas or stubborn stains as needed.
- Control Over Products: DIY cleaning lets you choose eco-friendly or hypoallergenic solutions, which is especially helpful for households with kids or pets.
Here’s a table summarizing the key steps and tips for DIY carpet cleaning to help readers easily understand the process:
| Step | Action | Tips & Notes |
|---|---|---|
| 1. Prepare Your Space | Remove furniture and clutter. Vacuum thoroughly to remove loose dirt and dust. | Vacuuming prevents dirt from turning into mud when mixed with water. |
| 2. Choose Cleaning Solution | Select a store-bought cleaner or make a homemade mix (e.g., vinegar + water). | Test the solution on a small, hidden area to ensure it doesn’t damage or discolor the carpet. |
| 3. Spot Treat Stains | Apply cleaner to stains, let sit for 5-10 minutes, and blot gently with a clean cloth. | Avoid rubbing stains, as this can push them deeper into the fibers. |
| 4. Use Carpet Cleaning Machine | Rent or buy a machine. Follow instructions, working in slow, overlapping passes. | Don’t oversaturate the carpet to avoid mold or musty odors. |
| 5. Rinse and Extract | Go over the carpet with plain water to remove residue. Use the machine’s extraction setting. | Proper extraction speeds up drying and prevents moisture-related issues. |
| 6. Dry Your Carpet | Open windows, use fans, and allow 6-12 hours for the carpet to dry completely. | Avoid walking on the carpet until it’s fully dry to prevent musty smells. |
| 7. Final Vacuum | Vacuum the dry carpet to fluff fibers and remove any resurfaced dirt. | This step leaves your carpet looking fresh and revitalized. |
Maintenance Tips Table
| Tip | Action | Why It’s Important |
|---|---|---|
| Vacuum Regularly | Vacuum high-traffic areas at least twice a week. | Prevents dirt from embedding into the carpet fibers. |
| Use Mats and Rugs | Place mats at entryways to trap dirt before it reaches your carpets. | Reduces the amount of dirt and debris that gets tracked onto your carpets. |
| Remove Shoes | Encourage family and guests to remove shoes before walking on carpets. | Minimizes dirt, mud, and stains from being brought indoors. |
| Spot Clean Spills Immediately | Treat spills as soon as they happen to prevent stains from setting. | Quick action reduces the likelihood of permanent stains. |
Benefits of DIY Carpet Cleaning Table
| Benefit | Description | Why It Matters |
|---|---|---|
| Cost Savings | DIY cleaning is significantly cheaper than hiring professionals. | Saves money while still achieving great results. |
| Convenience | Clean your carpets on your schedule, targeting specific areas as needed. | No need to wait for professional availability. |
| Control Over Products | Choose eco-friendly or hypoallergenic cleaning solutions. | Ideal for households with kids, pets, or allergies. |
| Improved Air Quality | Regular cleaning removes allergens and dust, improving indoor air quality. | Promotes a healthier living environment. |
This table format breaks down the DIY carpet cleaning process into easy-to-follow steps, making it simple for readers to understand and implement. It also highlights maintenance tips and benefits, ensuring readers get the most out of their efforts.
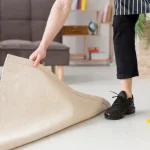
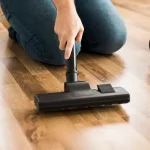
Step 1: Prepare Your Space
The first step to successful carpet cleaning is preparation. Remove all furniture, toys, and clutter from the room. This gives you a clear workspace and ensures no spots are missed.
Next, vacuum the carpet thoroughly. This step is crucial because it removes loose dirt, dust, and pet hair that could turn into mud when mixed with water.
Expert Tip: Carolyn Forte, Director of the Cleaning Lab at Good Housekeeping Institute, says, “Vacuuming is a critical first step in DIY carpet cleaning. It prevents dirt from turning into mud when mixed with water.”
Step 2: Choose the Right Cleaning Solution
Not all carpets are created equal, so it’s important to choose a cleaning solution that suits your carpet type. Here are a few options:
- Store-Bought Cleaners: These are effective for tough stains and come with instructions for safe use.
- Homemade Solutions: A mix of equal parts white vinegar and warm water works wonders for general cleaning. Add a few drops of essential oil for a fresh scent.
- Baking Soda Paste: For stubborn stains, mix baking soda with a little water to form a paste. Apply it to the stain, let it sit, and then blot it away.
Personal Anecdote: I once spilled red wine on my cream-colored carpet during a dinner party. Panic set in, but a quick mix of baking soda and vinegar saved the day. The stain lifted completely, and my guests were none the wiser!
Step 3: Spot Treat Stains
Before tackling the entire carpet, focus on spot-treating any visible stains. Apply your chosen cleaner to the stain and let it sit for 5-10 minutes. Then, gently blot the area with a clean, white cloth. Avoid rubbing, as this can push the stain deeper into the fibers.
Expert Tip: Maria Lepore, founder of Cleanipedia, advises, “Always test the cleaning solution in an inconspicuous area to ensure it doesn’t discolor the carpet.”
Step 4: Use a Carpet Cleaning Machine
For a deep clean, a carpet cleaning machine is your best friend. You can rent one from a local hardware store or invest in a model if you plan to clean regularly. Follow the manufacturer’s instructions carefully, using the recommended amount of cleaning solution and water.
Work in slow, overlapping passes to ensure thorough cleaning. Avoid oversaturating the carpet, as this can lead to mold or musty odors.
Expert Tip: Lisa Calcote, PhD, an environmental scientist, says, “DIY carpet cleaning can significantly improve indoor air quality, but be sure to thoroughly dry the carpet after cleaning to avoid mold growth.”
Step 5: Rinse and Extract
After cleaning, go over the carpet with plain water to remove any leftover cleaning solution. This step prevents residue from attracting dirt over time.
Use the machine’s extraction setting to remove as much water as possible. Proper extraction speeds up drying and prevents moisture-related issues.
Step 6: Dry Your Carpet
Drying is a critical step in the DIY carpet cleaning process. Open windows and doors to improve airflow, and use fans to speed up drying. Avoid walking on the carpet until it’s completely dry, which can take 6-12 hours, depending on humidity and ventilation.
Personal Anecdote: Once, I was so eager to finish cleaning that I walked on the carpet before it was fully dry. The result? A musty smell that lingered for days. Lesson learned: patience is key!
Step 7: Final Vacuum
Once the carpet is dry, give it a final vacuum to fluff up the fibers and remove any dirt that resurfaced during cleaning. This step leaves your carpet looking fresh and revitalized.
Tips for Maintaining Clean Carpets
To keep your carpets looking their best between cleanings, follow these maintenance tips:
- Vacuum Regularly: High-traffic areas should be vacuumed at least twice a week.
- Use Mats and Rugs: Place mats at entryways to trap dirt before it reaches your carpets.
- Remove Shoes: Encourage family members and guests to remove their shoes indoors.
- Spot Clean Spills Immediately: The quicker you treat a spill, the less likely it will stain.
Conclusion
DIY carpet cleaning is a simple, cost-effective way to keep your carpets looking and feeling fresh. With the right tools, techniques, and a little elbow grease, you can achieve professional-quality results at home. Plus, there’s something incredibly satisfying about seeing the transformation of a clean, refreshed carpet under your feet.
Expert Tip: Jeff Maahs, President of Stanley Steemer, says, “DIY carpet cleaning can be a great way to maintain your carpets between deep cleanings. Just be sure to follow the manufacturer’s instructions and use a quality carpet cleaner.”
So, the next time your carpets start looking a little tired, don’t hesitate to roll up your sleeves and give DIY cleaning a try. Your home—and your wallet—will thank you!
Studies on DIY Carpet Cleaning
- The Effectiveness of Home Carpet Cleaning Machines in Removing Allergens – American Journal of Public Health
- Indoor Air Quality and Health: A Review of the Literature – Environmental Health Perspectives
- The Impact of Carpet Cleaning on Dust Mite Allergens and Respiratory Symptoms – Journal of Allergy and Clinical Immunology
These studies highlight the benefits of regular carpet cleaning, including improved indoor air quality and reduced allergens.
By following this guide, you’ll not only save money but also gain the satisfaction of maintaining a clean, healthy home. Happy cleaning!
Related posts:
 How to Clean a Composite Sink: A Comprehensive Guide
 Living with Kids (and Spills): Tips for Cleaning High-Traffic Rugs
 How to Wash a Wool Blanket: A Simple, Safe Guide
 How to Get Hair Dye Out of a Tub: A Complete Guide
 How to Clean Laminate Floors Without Leaving a Film
 Busy Homeowners: Quick and Easy Pet Hair Removal Tips
 Deep Clean Your Carpets with a Portable Carpet Cleaner