If your kitchen feels too small to add an island, don’t give up on the dream just yet. Compact kitchen islands are possible, even in tiny spaces, when you think smart and creatively. With the right DIY ideas, you can design an island that saves space, provides storage, and adds beauty to your kitchen.
I remember when I lived in a tiny apartment with barely enough counter space to chop vegetables. I wished for an island but thought it was impossible. One weekend, I built a rolling kitchen cart with shelves, and suddenly my kitchen felt bigger and more useful. That experience taught me: even the smallest kitchen can enjoy the magic of an island with the right tweaks.
Let’s look at 10 DIY compact kitchen island ideas that can transform your space into something functional and stylish.
Space-Saving Marvels: 10 DIY Compact Kitchen Island Ideas
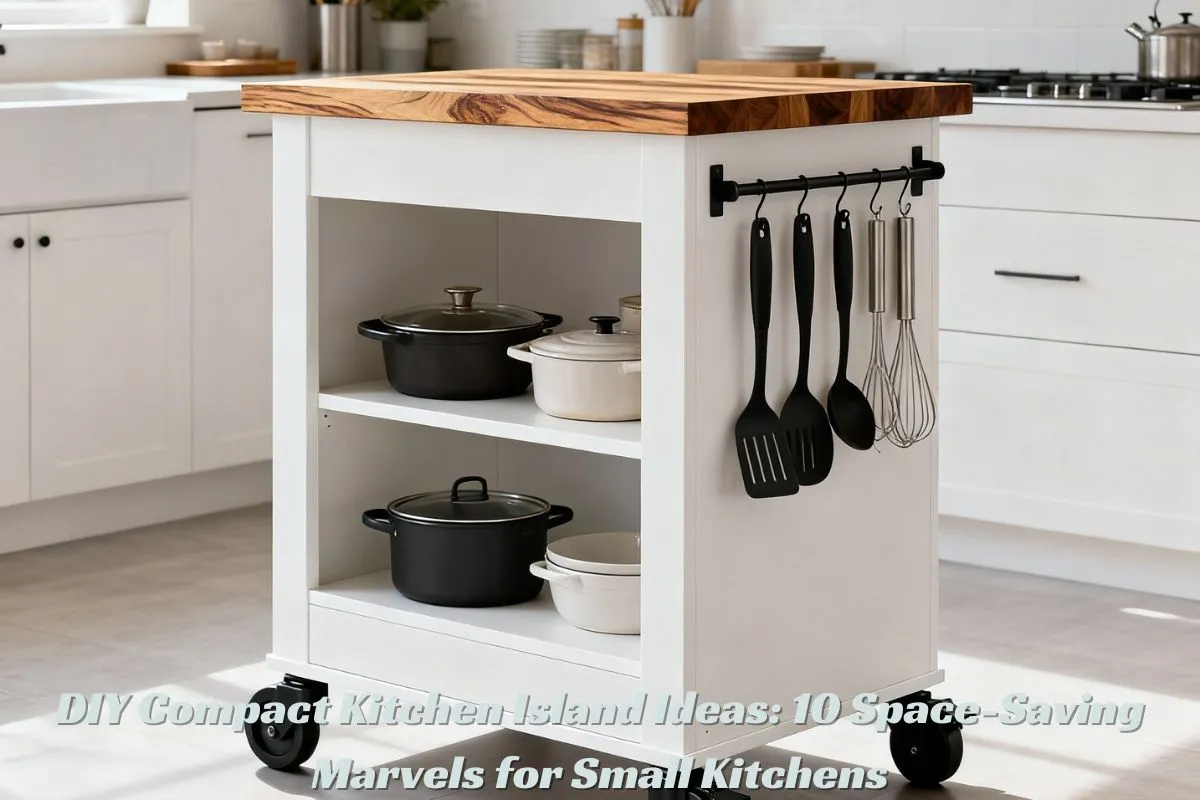
1. The Rolling Kitchen Cart Island
One of the easiest ways to “build” a compact kitchen island is to use a rolling cart. All you need is a wooden cart with lockable wheels.
-
Ideal dimensions: 24 inches wide x 18 inches deep.
-
Why it works: You can move it around freely. If guests come over, simply roll it out of the way.
-
Storage hack: Attach hooks on the side for spatulas or hang a small basket for onions and garlic.
A friend of mine added a butcher-block top to hers, and suddenly it doubled as a prep station for cutting veggies.
2. The Fold-Down Wall Island
Think of a Murphy bed, but for your kitchen! A fold-down wall island is mounted on the wall. When open, it creates counter space. When folded, it frees up room.
-
Recommended size: 36 inches long x 20 inches wide.
-
Materials: Two sturdy wall brackets, plywood, and hinges.
-
Clever tip: Add a chalkboard paint finish underneath so when it’s folded, it becomes a message or grocery list board.
This design is perfect for ultra-compact kitchens where every inch counts.
3. The Narrow Bookshelf Island
A sturdy bookshelf laid horizontally can become a kitchen island with storage included.
-
Best dimensions: 36 inches wide x 12 inches deep.
-
Bonus: Paint the unit the same color as your kitchen cabinets for a cohesive look.
-
Storage hack: Use the shelves for cookbooks, jars, or baskets of pantry supplies.
Back in my first home, I used an old IKEA bookshelf with wheels screwed on the bottom. It worked like a charm and cost me less than $30.
4. The Drop-Leaf Table Island
Drop-leaf tables are lifesavers in small kitchens. With the leaf down, they save space. With the leaf up, they expand into a full prep or dining island.
-
Suggested size: 40 inches wide with an 18-inch drop leaf extension.
-
Great for: Studio apartments where the kitchen doubles as the dining area.
-
Pro tip: Add a stool or two under it for instant breakfast seating.
5. The Repurposed Dresser Island
Got an old dresser lying around? Don’t throw it away. Turn it into a compact island with loads of storage.
-
Dimensions work best: 30–36 inches high for comfortable counter prep.
-
DIY hack: Replace the dresser top with a butcher-block or solid wood slab.
-
Storage tip: Use top drawers for utensils and keep pots or small appliances in the lower drawers.
I once transformed a thrift-shop dresser into a rustic kitchen island by sanding it down and staining it to match my kitchen shelves. It became the centerpiece of the room.
6. The Slim Bar Counter Island
If you have a very tight galley kitchen, a slim bar counter island is your best bet.
-
Width: 14–16 inches only!
-
Placement: Parallel to your counter to create a “mini galley.”
-
Storage idea: Install a hanging rack above it to store mugs or pans vertically.
This island doubles as a quick eating station and prep area without taking valuable floor space.
7. The Crate and Pallet Island
Wooden crates or pallets can be stacked and secured into a rustic-looking kitchen island.
-
Average build: Four crates arranged in a rectangle, 36 inches high.
-
Extra use: Add hooks for mugs, and leave some crates open for baskets.
-
Style tip: Paint it white or navy blue for a farmhouse chic vibe.
This is one of the cheapest and most eco-friendly DIY island ideas — plus, it looks trendy.
8. The Multi-Purpose Workstation Island
If you need your island to work hard, this design is for you. Build a workstation island that incorporates seating, shelves, and prep space all in one.
-
Dimensions: 48 inches long x 20 inches wide.
-
Features: Built-in cubbies, a wine rack, and bar stools.
-
Space hack: Store folding stools underneath to pull out only when needed.
This idea is perfect for renters or families who use the kitchen as both a workspace and dining area.
9. The Hidden Island on Wheels
Not ready to commit to a permanent island? Build one that slides under your counter or tucks away neatly when not in use.
-
Size: 30 inches wide x 24 inches tall, designed to fit under a counter or table.
-
Special additions: Use heavy-duty rolling wheels and add a lock mechanism for stability.
-
Great for: Small condos where space is flexible.
10. The Two-Tier Compact Island
A two-tier design separates prep space from dining space by having a raised counter at the back.
-
Measurements: 36 inches for the prep space, 42 inches for the dining side.
-
Benefit: Offers storage underneath and a small eating counter without crowding the kitchen.
-
Hack: Add floating shelves below to hold spices, jars, or bowls.
I’ve seen small kitchens instantly turn into cozy hangout spots with this setup.
What to Use Instead of a Kitchen Island?
If floor space just won’t allow an island, don’t worry. You can use:
-
A wall-mounted fold-down table.
-
A rolling bar cart with shelves.
-
A long console table behind your sofa (in open-plan spaces).
-
A movable butcher block station.
These alternatives give you island-like function without permanently taking up room.
How to Create an Island in a Small Kitchen?
Creating an island in a small kitchen is possible if you follow these tips:
-
Keep it narrow. Stick to 16–20 inches of width.
-
Add wheels. Movable islands are more flexible for tight spots.
-
Think vertical. Add shelves or hooks so storage goes upward, not outward.
-
Multi-purpose use. Your island should double as storage, prep, and even dining.
When I built mine, adding wheels was the smartest choice. I could push it into a corner during the week and roll it out fully when hosting family.
What is the 3×4 Kitchen Rule?
The 3×4 kitchen rule is a design guideline suggesting you need at least:
-
3 feet of clearance on each side of your island.
-
Or 4 feet between counters and appliances for smooth walkways.
In small kitchens, you might not always meet this rule fully, but keeping at least 36 inches of clearance ensures you can open cabinets and move comfortably.
Is It Cheaper to Buy or Build a Kitchen Island?
Building your own kitchen island is usually cheaper than buying one ready-made.
-
A store-bought compact island can cost $500–$1,500.
-
A DIY version with crates, old dressers, or tables can be under $100–$300.
The real value of DIY, though, is customization. Instead of being stuck with fixed sizes, you design your island to fit your kitchen perfectly.
When I repurposed an old dresser into an island, it cost me only $80 in materials. Buying something new of the same size and look would have been at least four times the price.
Final Thoughts
A small kitchen doesn’t have to limit your creativity. By building a compact DIY island, you can add storage, beauty, and functionality to your space. From rolling carts to repurposed dressers, each idea lets you personalize your kitchen without spending a lot.
Most importantly, compact islands prove that smart designs matter more than square footage. Whether you rent a small apartment or own a cozy home, these ideas can help you make your kitchen feel more open, stylish, and welcoming.
Related posts:
 Refrigerator Hacks: Clever Ways to Maximize Your Fridge Space
 How to Tighten Kitchen Faucet Nut Under Sink
 Faucet Leak: How to Fix a Dripping Faucet
 Faucet Finishes: Choosing the Right Look for Your Kitchen
 A Digital Thermometer for Every Kitchen: Home Chef’s Essential Tool
 Step-by-Step Guide to Installing Wooden Worktops Yourself
 CDA Oven Error Codes Explained: A Friendly, Complete Guide